Setup Guide

This page walks you through the setup steps for FlickMouse Server (Mac) and the iPhone app “FlickMouse”, with screenshots, in order.

  • How to install FlickMouse Server on your Mac and grant the required permissions
  • How to pair the iPhone app via QR code and establish a secure connection
  • Common checks when the cursor or key input does not respond

Setting up FlickMouse Server (Mac)

First, install FlickMouse Server on your Mac, grant Accessibility permission, and put it into a listening state. The current version does not use Input Monitoring permission, so you can leave it disabled.

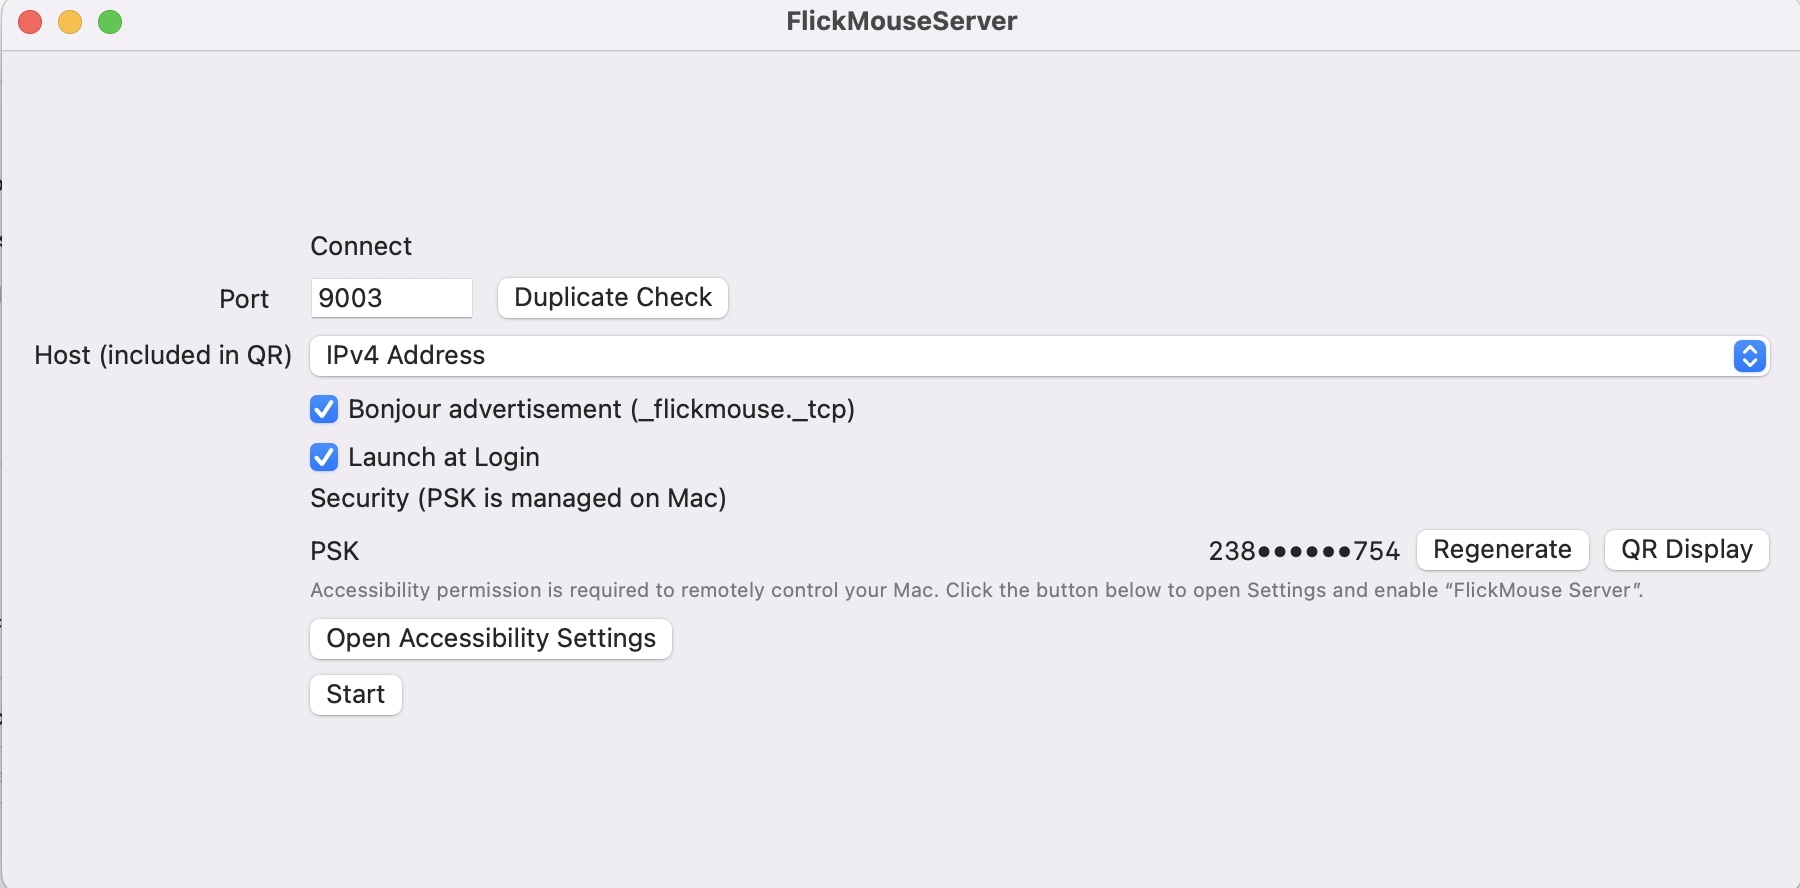
1. Download and install the app

  1. Download FlickMouseServer_1_1.dmg from the official website using the “Download FlickMouse Server (macOS)” button.
  2. Open the downloaded DMG and copy FlickMouseServer.app to the /Applications folder.
  3. Launch FlickMouseServer.app from the Applications folder.

If macOS shows “This is an app downloaded from the Internet…” on the first launch, choose “Open”.

2. Grant Accessibility permission

  1. In the FlickMouse Server window, click the “Open Accessibility” button (near the bottom right).
  2. Open System Settings → Privacy & Security → Accessibility and unlock the settings by clicking the lock icon at the bottom left.
  3. (Optional) You can open the Input Monitoring category via the “Open Input Monitoring” button, but the current version of FlickMouse Server does not use Input Monitoring permission, so you do not need to enable it.

FlickMouse requires Accessibility permission only. Input Monitoring permission is not used in this version of FlickMouse Server, so it can remain disabled. If input from the iPhone is not delivered to your Mac, first check that FlickMouseServer is enabled under Accessibility.

3. Check Port / Host and press Start

  1. On the main screen, check Port (default: 9000; you can change it to any available port) and Host. In most cases, the defaults are fine.
  2. If needed, enable the checkboxes for “Advertise via Bonjour” and “Launch at login”.

    “Advertise via Bonjour” allows the iPhone app to automatically discover FlickMouse Server on the same local network. It is not used for online advertising or tracking in any way.

  3. When you’re ready, click the Start button at the bottom left of the window.
  4. When the menu bar status changes from “Stopped” to “Running”, the server is ready to accept connections from your iPhone.

After you press Start once, you can switch Start/Stop from the menu bar. If you want it to start automatically after reboot, enable “Launch at login”.

FlickMouse Server main window (Port / Host / Start button)

Setting up FlickMouse (iPhone)

Next, install the iPhone app and pair it with your Mac using a QR code.

1. Install the app and open the initial screen

  1. On your iPhone, open the App Store, search for FlickMouse, and install the app.
  2. Make sure your Mac and iPhone are connected to the same Wi-Fi / LAN (tethering/hotspots or guest networks may not work).
  3. When you launch the app, you’ll first see the “Connection” screen. The top field is the IP address, the next field is the Port, and there is a Settings (enter/save PSK) button near the bottom.

On the initial “Connection” screen, you will import the PSK securely using a QR code.

Initial connection screen (IP address and Port fields)

2. Import Host / Port / PSK using a QR code

  1. On the “Connection” screen, tap Settings (enter/save PSK) to open the “Import Settings” screen.
  2. Tap Import via QR scan. The first time, iOS will ask for camera access. Choose “Allow”.
  3. On the Mac, in FlickMouse Server, click Show QR, then scan the displayed code with your iPhone. The Mac side must be in Start state (listening).
  4. After scanning, Host will be filled with “IP address:port”, and PSK will be filled with a 64-character shared key automatically. For security, only part of the PSK is shown in the app, and the QR code does not embed the PSK as a plain-text string.
  5. After confirming the values, tap Back to IP input to return to the connection screen.

The QR code includes the Host (IP address / Port) and an encrypted PSK, allowing you to share settings more safely and reliably than manual entry. The PSK is stored securely on your iPhone and is used only to protect communication with your Mac.

Import settings screen (before scanning)
Import settings screen (after scanning)

3. Connect and verify (Local Network permission)

  1. Back on the connection screen, confirm that the IP address and Port have been filled in automatically.
  2. Tap the Connect button. The first time, iOS will show a dialog asking whether to allow discovery of devices on the local network. Choose “Allow”.
  3. When the connection succeeds, the main FlickMouse input screen will appear. If trackpad and key actions affect your Mac, the setup is complete.

The trackpad area controls pointer movement. The key area at the bottom lets you send actions like Copy / Paste / Delete / arrow keys / Enter with one tap. If you open the shortcut layer from the bottom, you can execute frequent actions like Undo, desktop switching, Mission Control, Full Screen, and Reload via horizontal scrolling.

Connection settings loaded (IP, Port)
Main input screen after connection (trackpad + shortcuts)

FlickMouse settings (iPhone)

You can fine-tune the trackpad behavior, scroll amount, and key auto-repeat from the iPhone “Settings” screen. In most cases, the default values work well, but adjust them if you want to match your environment (laptop, large display, etc.).

What you can adjust in Settings

  1. Open the “Settings” screen from the main input screen using the Settings button (gear icon).
  2. Vertical scroll (Natural): Toggle “natural scrolling” like macOS (moving your finger upward scrolls the content upward).
  3. Horizontal scroll (enabled when ON): Toggle whether horizontal scrolling is enabled when swiping left/right with two fingers.
  4. Scroll sensitivity: Adjust the base sensitivity of how much scrolling occurs relative to your finger movement.
  5. Scroll amount (multiplier): A multiplier applied to the sensitivity. Use a smaller value for fine control, and a larger value to scroll through pages quickly.
  6. Pointer speed: Adjust pointer movement speed (similar to macOS “Tracking speed”).
  7. Move send rate: Sets how many times per second (Hz) touch movement is sent to the Mac. Higher values can make the pointer feel smoother, but may slightly increase network traffic and battery usage. Normally, “120 Hz (recommended)” is fine.
  8. Show touch effects: When ON, shows a visual effect at the tap position to make it easier to see where you are interacting.
  9. Send Enter on send: When ON, sending from the input bar also triggers an Enter key press on the Mac. Useful for chat apps when you want “send + enter” in one action.
  10. Auto-repeat delay / interval: Adjust how long you need to press and hold before auto-repeat starts, and the repeat interval after that. Tune this to your preference (e.g., for holding arrow keys).
  11. Start screen on launch: Choose which screen appears when the FlickMouse app launches. Select “A) Start with IP input” to confirm the target each time before connecting, or “B) Auto reconnect to last server” to reconnect to the previously used server automatically and resume quickly. If you usually connect to the same Mac (e.g., at home), “Auto reconnect to last server” is convenient.

These settings affect only the interaction feel on the iPhone side and do not change the Mac-side resident software settings or security. If something doesn’t feel right, try adjusting values gradually.

FlickMouse settings screen

Common pitfalls & quick checks

The cursor or key input does not respond

  • On your Mac, open Accessibility settings and confirm that FlickMouseServer is enabled.
  • Check that FlickMouse Server’s main window or the menu bar status is “Listening / Connected”.
  • If other remote-control apps or keyboard utilities are running at the same time, temporarily stop them and test again.

Cannot connect from the iPhone

  • Confirm that your Mac and iPhone are connected to the same Wi-Fi / LAN.
  • Check whether macOS firewall or security software is blocking inbound connections to the port used by FlickMouse Server (default: 9000).
  • If you changed the Port/Host in FlickMouse Server, show the QR code again and re-register the latest information on the iPhone.

It stopped connecting after regenerating the PSK

  • When you regenerate the PSK on the Mac, all connections using the old PSK become invalid.
  • Use the “Show QR” button in FlickMouse Server to display the new QR code, then scan it again on the iPhone.
  • If you use multiple iPhones, you must re-register on all devices after changing the PSK.